
# Image Sprout
Image Sprout is a local image-generation tool for building consistent outputs from reference images and reusable instructions.
Without a tool like this, you end up repeating the same context over and over:
- upload the same reference images again
- restate the same style direction again
- restate the same subject guidance again
- restate the same persistent instructions again
Image Sprout turns that repeated context into a project you can reuse.
It runs in two modes over the same local project data:
- a local web app for interactive setup, review, and iteration
- a CLI for shell workflows and AI agents
## What Problem It Solves
Most image-generation tools are prompt-first. That works for one-off outputs, but it breaks down when you need consistency.
Image Sprout gives you a project with:
- reference images
- a `Visual Style`
- a `Subject Guide`
- persistent `Instructions`
- sessions and runs
That lets you set up the context once, then keep generating and iterating without rebuilding it from scratch each time.
## Demo
### Project Setup Walkthrough
This video shows creating the project setup by adding a general reference image and deriving both the style and subject guide:
[](https://www.youtube.com/watch?v=2lwqKotC5KU)
### Generation And Iteration Walkthrough
This video shows generating images from a project that already has its style and subject guide, then iterating on the results:
[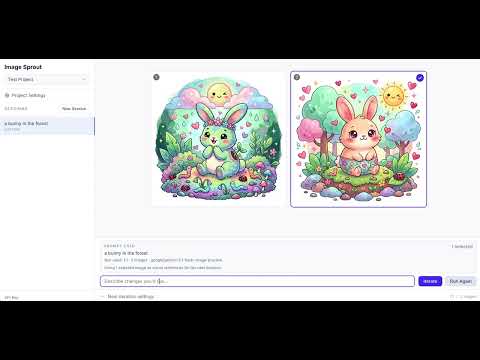](https://www.youtube.com/watch?v=jt7wE-ttwxU)
## Install
### Install From npm
Install Image Sprout globally from npm:
```bash
npm install -g image-sprout
```
If you prefer not to install globally, you can also run it with `npx image-sprout`.
### Install From The GitHub Repo
If you want to work from source instead, clone the repo and install dependencies locally:
```bash
git clone <repo-url>
cd image-sprout
npm install
```
From the repo checkout, you can run the app with the local scripts or run the built CLI directly.
### Install As An Agent Skill
If you're using an AI agent runtime, install the skill instead of the CLI:
**ClawHub (OpenClaw):**
```bash
npx clawhub@latest install image-sprout
```
Or if the ClawHub CLI is already installed:
```bash
clawhub install image-sprout
```
**tmc-marketplace (Claude Code / Codex):**
```bash
claude plugin add tmchow/tmc-marketplace/plugins/image-sprout
```
**Manual:** point your agent at the [skill file](https://raw.githubusercontent.com/tmchow/image-sprout/main/skills/agents/SKILL.md) directly. This won't auto-update when new versions are released.
## How To Run It
You can use either mode.
### Web App
Launch the local web app:
```bash
image-sprout web
```
This starts the interactive local app backed by the same on-disk store the CLI uses.
Pass `--open` to automatically open the app in your default browser:
```bash
image-sprout web --open
```
Pass `--port` to use a custom port (default is 4310):
```bash
image-sprout web --port 8080
```
### CLI
Run CLI commands directly:
```bash
image-sprout help
```
## Bring Your Own OpenRouter Key
Image Sprout requires your own [OpenRouter](https://openrouter.ai/) API key.
### Configure The Key In The CLI
```bash
image-sprout config set apiKey <your-openrouter-key>
```
Useful config commands:
```bash
image-sprout config show
image-sprout config get model
image-sprout config path
```
Notes:
- `config show` and `config get apiKey` do not print the raw API key
- CLI output is text by default; pass `--json` for machine-readable output
### Configure The Key In The Web App
Open the app with `image-sprout web`.
If the API key is missing, the app will prompt you to set it. You can also manage it from the settings flow inside the app.
## Models
Image Sprout defaults to `Nano Banana 2` (`google/gemini-3.1-flash-image-preview`).
You can also add other OpenRouter models, but Image Sprout only accepts models that:
- accept text input
- accept image input
- produce image output
### Manage Models In The Web App
Use the gear icon next to the model selector.
From there you can:
- add a model by OpenRouter model id
- rename its display label locally
- set the default model
- restore the built-in defaults
### Manage Models In The CLI
```bash
image-sprout model list
image-sprout model add openai/gpt-5-image
image-sprout model set-default google/gemini-3.1-flash-image-preview
image-sprout model restore-defaults
```
### Analysis Model
Guide derivation uses a separate analysis model. The default is `google/gemini-3.1-flash-image-preview`.
To use a different model for derivation:
```bash
image-sprout config set analysisModel <openrouter-model-id>
```
You can also override it per-command:
```bash
image-sprout project derive my-blog --target both --analysis-model google/gemini-2.5-flash
```
## Recommended Project Setup
The general workflow is:
1. Create a project.
2. Add at least 3 reference images.
3. Decide whether the project should preserve style, subject, or both.
4. Derive the appropriate guide or guides.
5. Generate new images from that saved project context.
### How To Think About The Project
Use these fields intentionally:
- `Visual Style`: how outputs should look
- `Subject Guide`: what subject identity should stay consistent
- `Instructions`: persistent generation instructions that should apply every time
Examples for `Instructions`:
- watermark requirements
- framing requirements
- text-placement requirements
- branding constraints
## Web App Workflow
### 1. Create A Project
Open the web app and create a new project.
### 2. Add Reference Images
Best practice:
- start with at least 3 strong reference images
- use higher-quality references instead of many weak ones
- if the project needs split references, enable separate style and subject references in Project Settings
Default behavior:
- uploaded references are shared
- shared references can drive both `Visual Style` and `Subject Guide`
Advanced behavior:
- if needed, split references into:
- style references
- subject references
### 3. Decide Whether The Project Is Style, Subject, Or Both
Common cases:
- `style only`: you want consistent look, but subjects can vary
- `subject only`: you want consistent subject identity, but style can vary
- `both`: you want both look and subject consistency
### 4. Derive Guides
In Project Settings, derive the guides you actually need:
- `Derive Style`
- `Derive Subject`
- `Derive Style + Subject`
Recommended mapping:
- style-only project: derive style
- subject-only project: derive subject
- style-and-subject project: derive both
When deriving both guides from different reference sets, both analyses run in parallel.
Review the derived text before saving it.
### 5. Save The Project Profile
Project Settings does not auto-save guide edits. Save after:
- deriving guides
- editing guides manually
- updating instructions
### 6. Generate Images
Once the project is configured, generate from the main canvas.
The main prompt is the per-run request. The image count can be 1, 2, 4, or 6.
Examples:
- `a flower in a forest`
- `the same character sitting at a cafe in morning light`
- `product shot on a neutral tabletop with more negative space`
### 7. Iterate
After a run:
- select one or more returned images to steer the next iteration visually
- describe the change you want
- use `Iterate`
- use `Run Again` when you want another take on the same run without changing the prompt
## CLI Workflow
### 1. Create A Project
```bash
image-sprout project create my-blog
```
### 2. Add Reference Images
Add at least 3 references. By default, refs apply to both style and subject:
```bash
image-sprout ref add --project my-blog ./ref-1.png ./ref-2.png ./ref-3.png
```
If you need separate pools:
```bash
image-sprout ref add --project my-blog --role style ./style-1.png ./style-2.png
image-sprout ref add --project my-blog --role subject ./subject-1.png ./subject-2.png
```
### 3. Set Optional Persistent Instructions
```bash
image-sprout project update my-blog --instructions "Bottom right corner should say 'My Blog' in a legible but subtle watermark."
```
### 4. Decide Whether The Project Uses Style, Subject, Or Both
Then derive the right guide or guides.
Style only:
```bash
image-sprout project derive my-blog --target style
```
Subject only:
```bash
image-sprout project derive my-blog --target subject
```
Both:
```bash
image-sprout project derive my-blog --target both
```
Inspect readiness:
```bash
image-sprout project status my-blog
```
### 5. Generate Images
```bash
image-sprout project generate my-blog --prompt "a flower in a forest"
```
Generate a single image:
```bash
image-sprout project generate my-blog --prompt "a flower in a forest" --count 1
```
### 6. Inspect Sessions And Runs
```bash
image-sprout session list --project my-blog
image-sprout run list --project my-blog
image-sprout run latest --project my-blog --json
```
### 7. Delete Sessions
```bash
image-sprout session delete --project my-blog <session-id>
```
Deleting a session removes the session and all of its runs and generated images.
## CLI Aliases
For convenience, `generate` and `analyze` are available as top-level aliases:
```bash
image-sprout generate --project my-blog --prompt "a flower in a forest"
image-sprout analyze --project my-blog --target both
```
These are shorthand for `project generate` and `project derive`, respectively.
## Agent Skills
Image Sprout ships skill files so AI agents can use the full workflow — project setup, reference management, guide derivation, generation, and result inspection — without additional documentation. See [Install As An Agent Skill](#install-as-an-agent-skill) for setup.
| Runtime | Path | Distribution |
|---------|------|--------------|
| OpenClaw / ClawHub | `skills/openclaw/SKILL.md` | Published to ClawHub directly |
| Claude Code + Codex | `skills/agents/SKILL.md` | Via tmc-marketplace plugin |
## CLI For Agents
The CLI is the better mode for AI agents because it:
- works directly from explicit commands
- supports `--json` for machine-readable output
- operates on the same project store as the web app
- makes project state inspectable and scriptable
Examples:
```bash
image-sprout project show my-blog --json
image-sprout project status my-blog --json
image-sprout run latest --project my-blog --json
```
## Command Help
```bash
image-sprout help
image-sprout project --help
image-sprout ref --help
image-sprout session --help
image-sprout model --help
image-sprout config --help
```
## Configuration
The following config keys are available:
| Key | Description | Default |
|-----|-------------|---------|
| `apiKey` | OpenRouter API key | (empty) |
| `model` | Default generation model | `google/gemini-3.1-flash-image-preview` |
| `sizePreset` | Default image aspect ratio (`16:9`, `1:1`, `9:16`) | `16:9` |
| `imageCount` | Default number of images per run (`1`, `2`, `4`, `6`) | `4` |
| `analysisModel` | Model used for guide derivation | `google/gemini-3.1-flash-image-preview` |
```bash
image-sprout config show
image-sprout config set <key> <value>
image-sprout config get <key>
image-sprout config unset <key>
image-sprout config path
```
## Development
For local repo development:
```bash
npm install
```
```bash
npm run dev # Vite dev server
npm run build # Build the web app
npm run build:cli # Build the CLI
npm run web # Build web + CLI, then launch local web mode
npm run check # Svelte + TypeScript checks
npm test # Run all tests
npm run test:watch # Watch tests
```
## Architecture
```text
CLI commands -----------\
> shared on-disk project/config/model store
Local web app -----------/
```
Important implementation pieces:
- `src/cli/project-store.ts` — shared disk-backed persistence
- `src/cli/model-registry.ts` — shared model registry
- `src/cli/web-server.ts` — local bridge for the web app
- `src/lib/api/openrouter.ts` — generation and guide derivation
- `src/lib/stores/*.svelte.ts` — bridge-backed web state
## Current Stack
- Svelte 5
- TypeScript
- Tailwind CSS v4
- Vite
- OpenRouter
- Vitest