write-swarm-client
Create an active, dataset-driven AgentJet swarm client. Write agent_roll.py and agent_run.py that iterate through a dataset, execute agent workflows, and compute rewards for reinforcement learning training with AgentJet Swarm.
Informações da origem
- Repositório
- modelscope/AgentJet
- Última atividade na origem
- 13 de maio de 2026 às 05:03
- Idioma detectado do SKILL.md
- inglês
- Estrelas
- 239
- Forks
- 28
Opções de instalação
Por padrão, está selecionado o prompt que primeiro revisa a origem. Você pode mudar para um comando direto ou baixar uma cópia local.
Revise os arquivos de origem
Leia o SKILL.md e os arquivos complementares exibidos pelo SkillsMP antes de decidir se vai instalar.
Exibindo SKILL.md
SKILL.md
Instruções da origem · Visualização somente leitura- name
- write-swarm-client
- description
- Create an active, dataset-driven AgentJet swarm client. Write agent_roll.py and agent_run.py that iterate through a dataset, execute agent workflows, and compute rewards for reinforcement learning training with AgentJet Swarm.
- license
- Complete terms in LICENSE.txt
## Introduction:
Your task is to create a trainable Agent (or Agent Loop, multi-agent system, etc.) based on the requirements, and provide it to the user for reinforcement learning training. Under the AgentJet reinforcement learning framework, this is very simple.
First, give the agent system a name based on the user's requirements, always place your code at ``tutorial/opencode_build_*`, for example `opencode_build_math_agent`.
Next, create the directory:
`tutorial/opencode_build_math_agent`
Then, create the Agent source files:
- `tutorial/opencode_build_math_agent/agent_roll.py` (Use `tutorial/example_academic_trans_swarm/trans_roll.py` as a template. There aren't many changes — the key is to ask the user for the necessary parameters.)
- `tutorial/opencode_build_math_agent/agent_run.py` (Create the function or class to run the agent based on the user's requirements. Synchronous or asynchronous are both fine.)
- `tutorial/opencode_build_math_agent/readme.md` (Agent description, along with training and debugging instructions.)
## How to Write the Agent
Write the agent using the OpenAI SDK. It mainly includes the following three functions (along with any necessary sub-functions and sub-modules):
```
from ajet.schema.task import Task, WorkflowOutput
def _compute_reward(...)
def _execute_agent(...)
def run_agent_and_compute_reward(task: Task, base_url: string, api_key: string) -> WorkflowOutput:
```
In `agent_roll`, simply import `run_agent_and_compute_reward`.
- **Key points for writing the agent:** Efficiently complete the user's given task through the collaboration of one or several Agents.
- **Key points for writing the reward:** For things that are easy to verify, calculate directly using rules. For things that are hard to verify, follow the approach in `tutorial/example_academic_trans_swarm/train_multi_model/trans_reward.py` and use other large models to create an LLM-as-Judge program.
## Training and Debugging Instructions
Overall, the user first runs `ajet-swarm start`, then runs `agent_roll.py`, and training begins. You do not need to and are not allowed to run these bash commands.
- First, help the user write `agent_run.py` and `agent_roll.py`.
- Then, write clear instructions to guide the user through training (`readme.md`).
Your task is then complete.
Below are some reference materials.
---
## Introduction:
Your task is to create a trainable Agent (or Agent Loop, multi-agent system, etc.) based on the requirements, and provide it to the user for reinforcement learning training. Under the AgentJet reinforcement learning framework, this is very simple.
First, give the agent system a name based on the user's requirements, for example `opencode_build_math_agent`.
Next, create the directory:
`tutorial/opencode_build_math_agent`
Then, create the Agent source files:
- `tutorial/opencode_build_math_agent/agent_roll.py` (Use `tutorial/example_academic_trans_swarm/trans_roll.py` as a template. There aren't many changes — the key is to ask the user for the necessary parameters.)
- `tutorial/opencode_build_math_agent/agent_run.py` (Create the function or class to run the agent based on the user's requirements. Synchronous or asynchronous are both fine.)
- `tutorial/opencode_build_math_agent/readme.md` (Agent description, along with training and debugging instructions.)
## How to Write the Agent
Write the agent using the OpenAI SDK. It mainly includes the following three functions (along with any necessary sub-functions and sub-modules):
```
from ajet.schema.task import Task, WorkflowOutput
def _compute_reward(...)
def _execute_agent(...)
def run_agent_and_compute_reward(task: Task, base_url: string, api_key: string) -> WorkflowOutput:
```
In `agent_roll`, simply import `run_agent_and_compute_reward`.
- **Key points for writing the agent:** Efficiently complete the user's given task through the collaboration of one or several Agents.
- **Key points for writing the reward:** For things that are easy to verify, calculate directly using rules. For things that are hard to verify, follow the approach in `tutorial/example_academic_trans_swarm/train_multi_model/trans_reward.py` and use other large models to create an LLM-as-Judge program.
## Training and Debugging Instructions
Overall, the user first runs `ajet-swarm start`, then runs `agent_roll.py`, and training begins. You do not need to and are not allowed to run these bash commands.
- First, help the user write `agent_run.py` and `agent_roll.py`.
- Then, write clear instructions to guide the user through training (`readme.md`).
Your task is then complete.
Below are some reference materials.
---
# Using AgentJet Swarm to Train Your Agents
AgentJet Swarm opens infinite possibilities for both LLM Agent engineers and LLM researchers. It is very easy to use and understand. In fact, there is no need for verbose explaination, code explains itself:
## (1/2) Launching a Swarm Server ("aircraft carrier")
Simply run `ajet-swarm start` on a GPU server (or GPU cluster master), and we are done ✅. (You may ask: what about training config? Well, config will come from swarm client.)
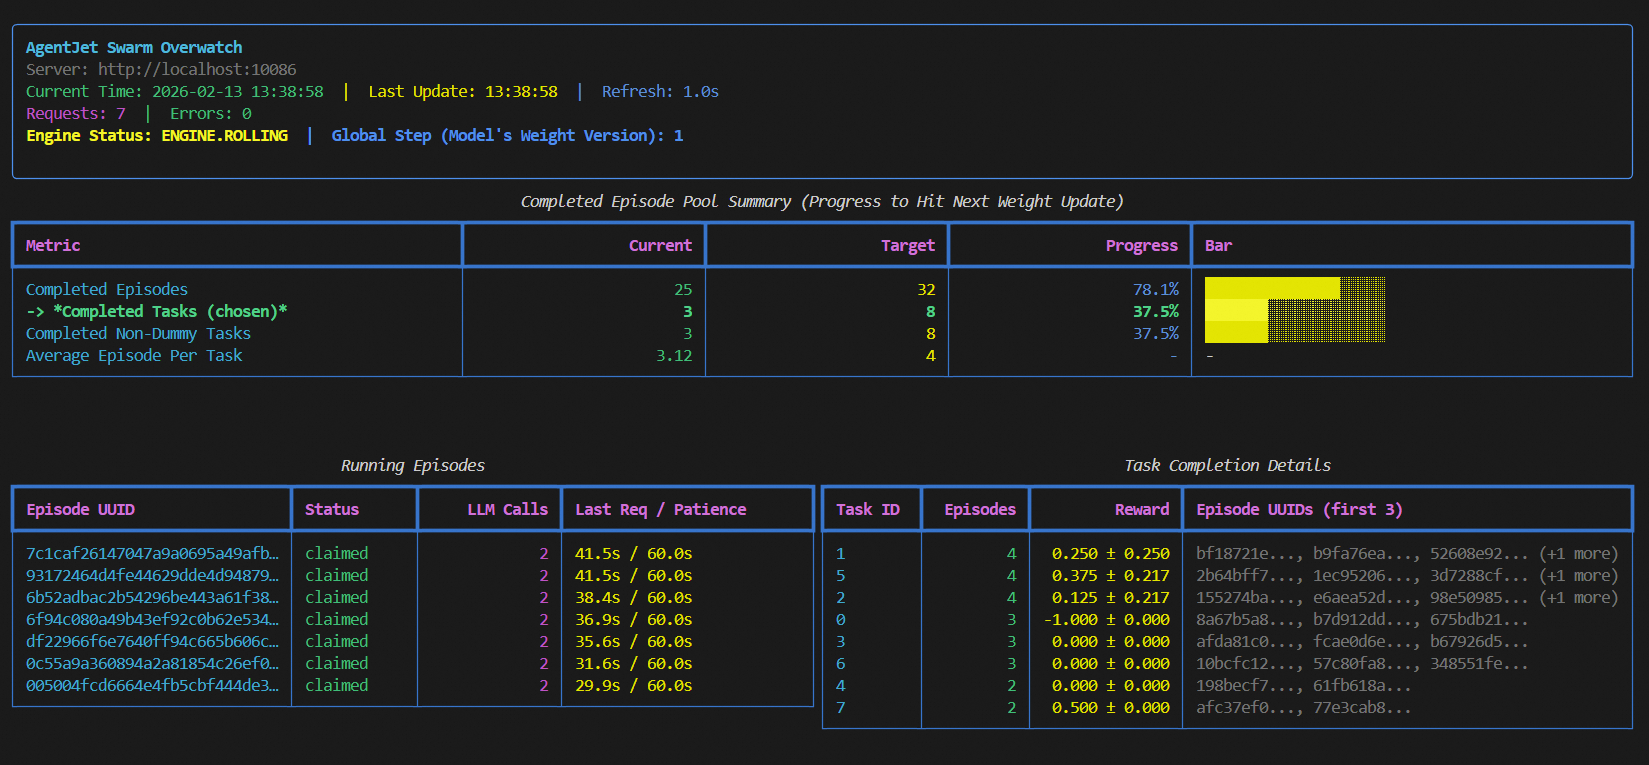
Notes:
1. launch server together with a swarm monitor:
```bash
(ajet-swarm start &> ajet-swarm-server.log) & (ajet-swarm overwatch)
```
2. overwatch swarm status with url:
```bash
ajet-swarm overwatch --swarm-url=http://localhost:10086
```
3. changing customized port (default port is 10086):
```bash
ajet-swarm start --swarm-port=10086
```
4. if you are using a multi-node cluster to train huge models, make sure you have already set up the ray cluster before you hit `ajet-swarm start`.
## (2/2) Launching Swarm Clients ("jets")
You can run any amount of swarm client:
- on any devices (macbook, workstation, the same machine you run swarm-server, **wherever you want**).
- at any time (before or in the middle of a training, **whenever you want**)
But just remember: **ALL** swarm clients are equally authorized to order swarm server(s) **start or terminate** the training process. There is **no such role like Queen** in AgentJet Swarm.
### 2-1. Connecting to a swarm server and make it rock&roll
The primary objective of swarm client is to make sure network connection is good.
Now, create a python script and start coding:
```python
from ajet.tuner_lib.experimental.swarm_client import SwarmClient
REMOTE_SWARM_URL = "http://localhost:10086" # Change to your swarm remote url
swarm_worker = SwarmClient(REMOTE_SWARM_URL)
```
Secondly, generate a configuration (basically VERL yaml, but slightly different), **connect** to swarm server and then tell the swarm server **which model to train**, etc. When configuration is ready, tell engine to read yaml and begin VERL training cycles with `auto_sync_train_config_and_start_engine`.
```python
LOCAL_GRPO_N = 32
yaml_job = AgentJetJob(
experiment_name="math_gsm8k_grpo",
algorithm="grpo",
n_gpu=4,
model='/mnt/data_cpfs/model_cache/modelscope/hub/Qwen/Qwen/Qwen2.5-3B-Instruct',
batch_size=LOCAL_GRPO_N,
num_repeat=4,
# LoRA parameters (optional, for parameter-efficient fine-tuning):
# lora_rank=8, # Set > 0 to enable LoRA training (default: 0 = disabled)
# lora_alpha=16, # LoRA alpha scaling factor (default: 16)
# lora_target_modules="all-linear", # Target modules for LoRA (default: "all-linear")
)
# hint: you can `yaml_job.dump_job_as_yaml('./config.yaml')` to take a look at the full configuration
# hint: you can `yaml_job.build_job_from_yaml('./config.yaml')` to load yaml configuration as override. (there are some configurations that must be edited from yaml)
swarm_worker.auto_sync_train_config_and_start_engine(yaml_job)
```
**LoRA Training**: To enable LoRA (Low-Rank Adaptation) for parameter-efficient fine-tuning, set `lora_rank > 0`. This significantly reduces GPU memory usage and training time while maintaining good performance.
**Full AgentJetJob Arguments**: Run `help(AgentJetJob)` or check `ajet/copilot/job.py` for all available parameters including:
| Parameter | Description |
|-----------|-------------|
| `model` | Path to the model to train |
| `n_gpu` | Number of GPUs per node |
| `algorithm` | Advantage estimator (e.g., 'grpo') |
| `batch_size` | Training batch size |
| `num_repeat` | Number of repeated samples per task |
| `max_prompt_length` | Maximum prompt token length |
| `max_response_length` | Maximum response token length |
| `max_model_len` | Maximum total token length |
| `mini_batch_num` | Number of mini-batches per update |
| `lora_rank` | LoRA rank (0 = disabled, >0 = enabled) |
| `lora_alpha` | LoRA alpha scaling factor |
| `lora_target_modules` | Target modules for LoRA |
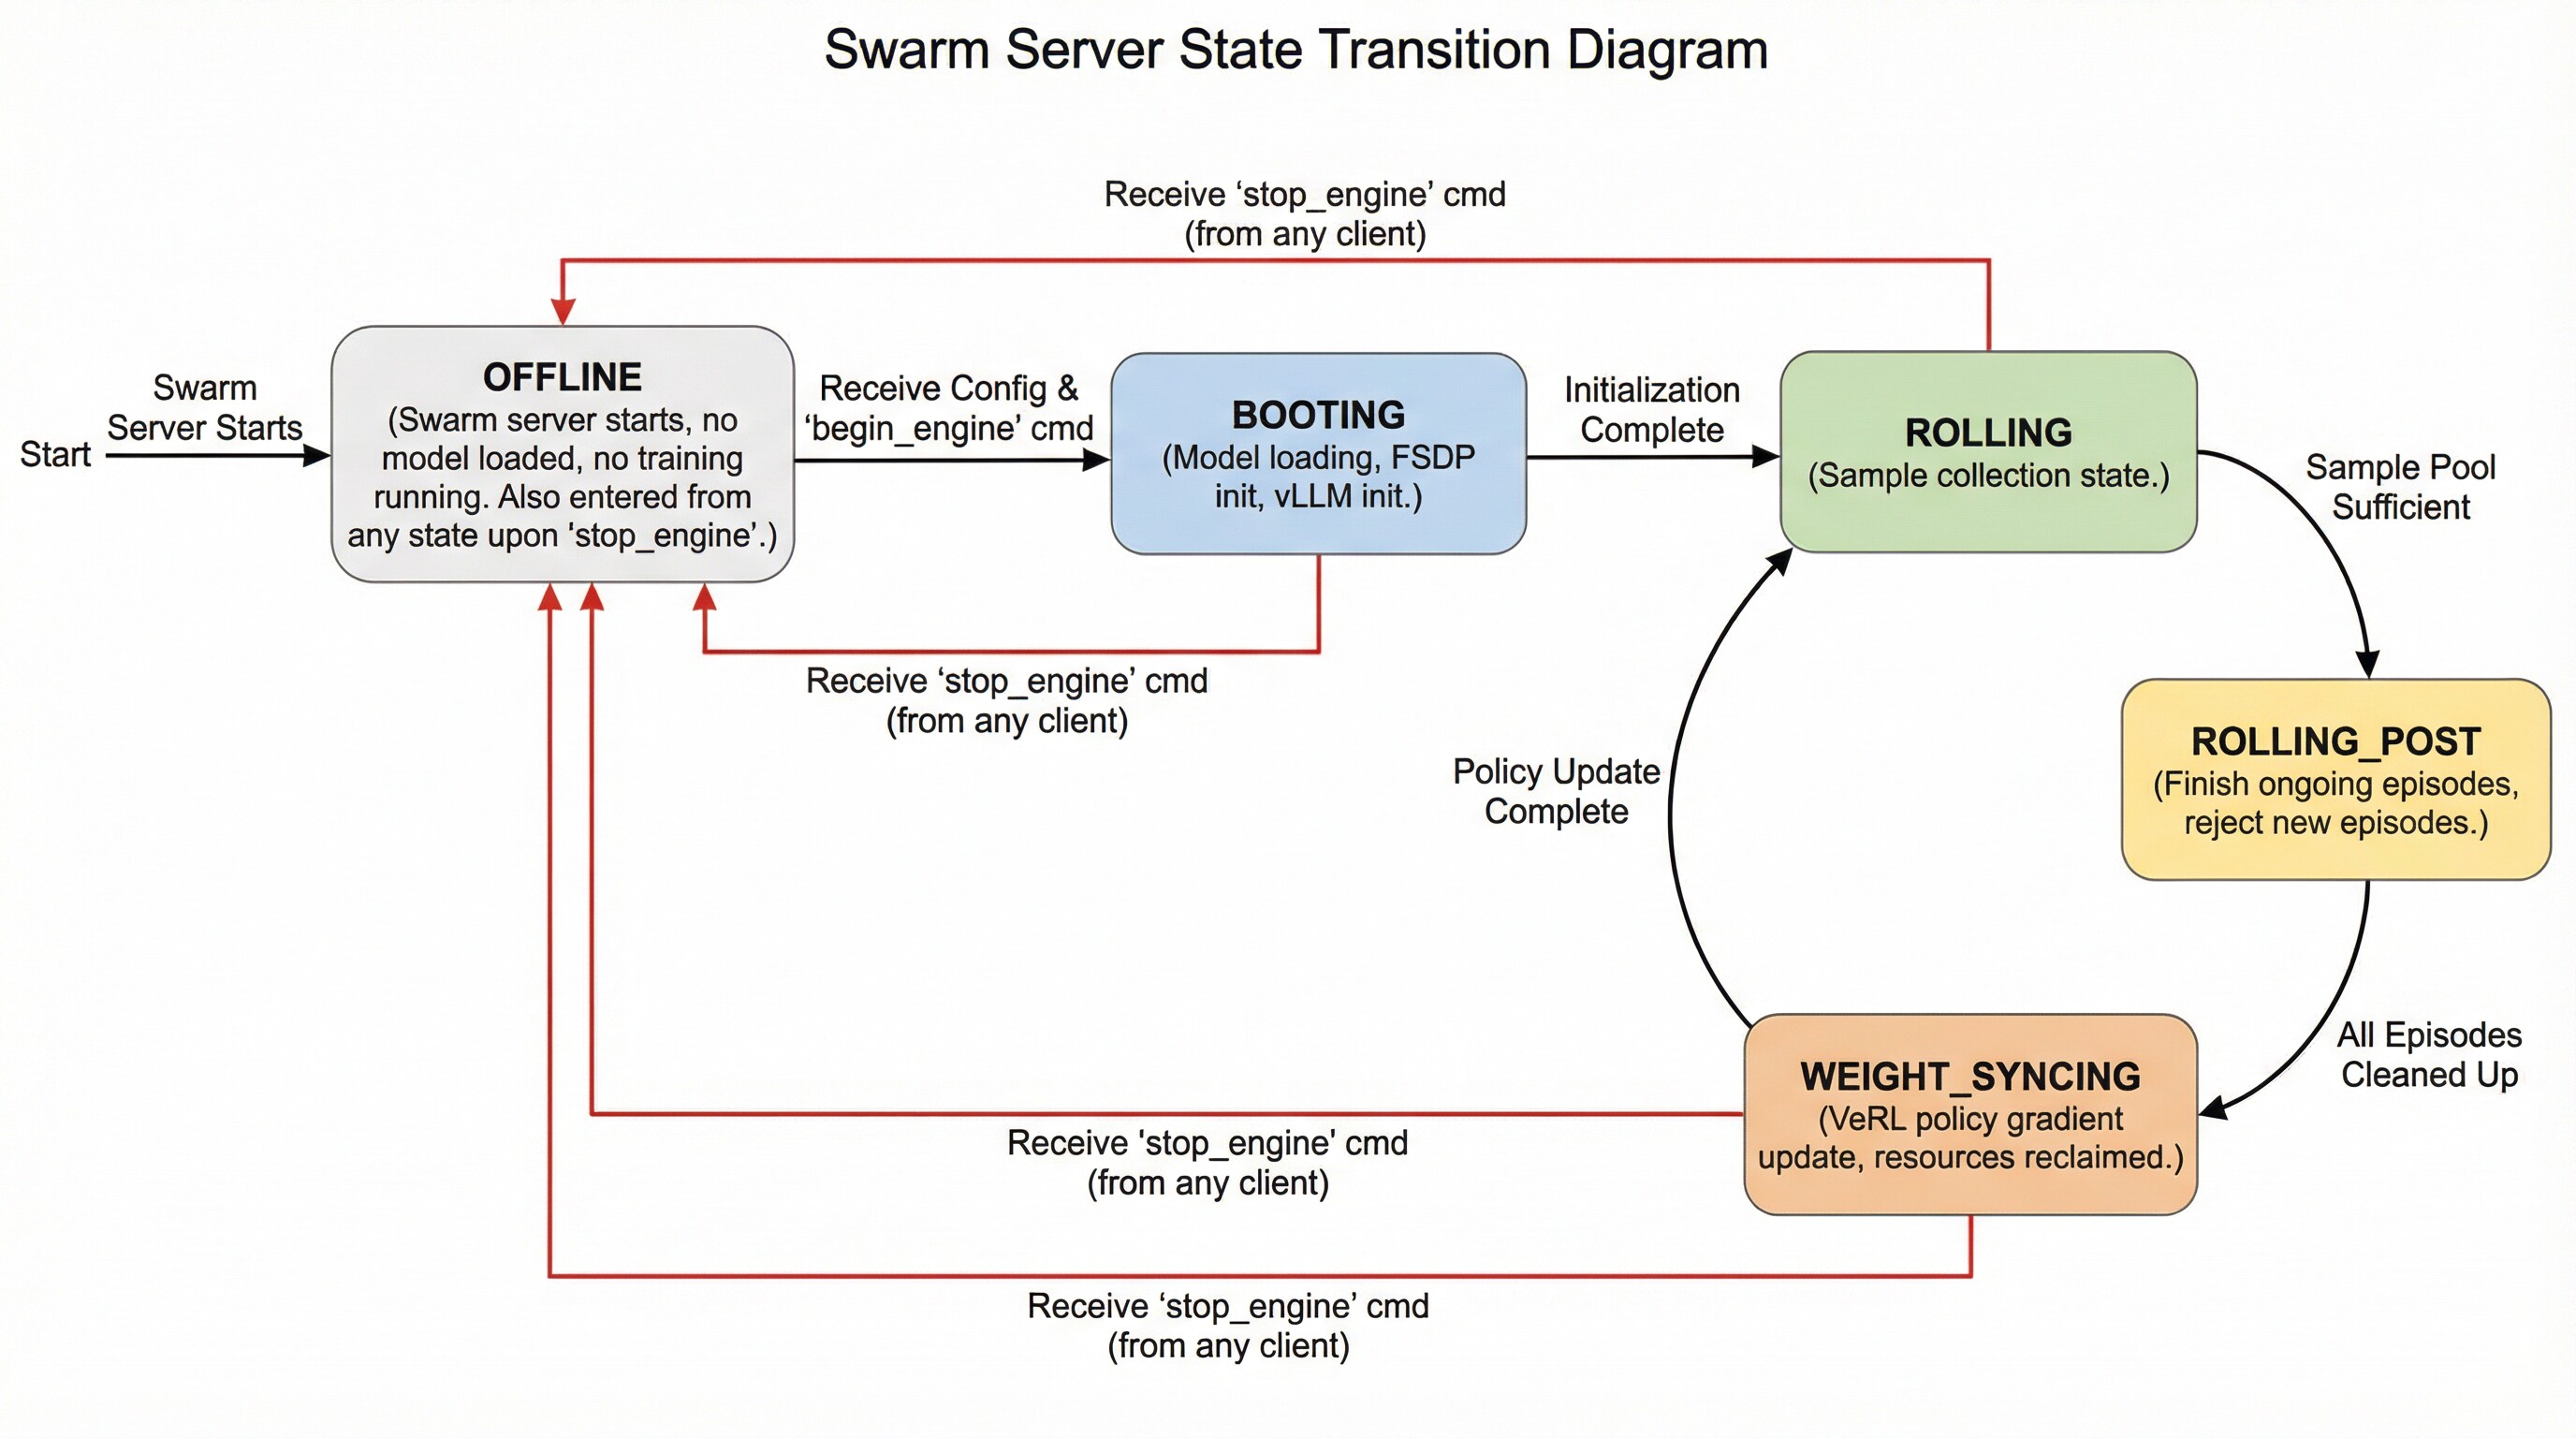
The swarm server can be in the following states and transition between them as follows:
- **OFFLINE**: The swarm server is started but does not load any models or perform any training. It enters this state directly after startup. Additionally, it transitions to this state upon receiving a `stop_engine` command from (any) client while in any other state.
- **BOOTING**: The swarm server enters this state upon receiving a configuration followed by an explicit `begin_engine` command. In this state, it loads model parameters, initializes FSDP, and initializes vLLM.
- **ROLLING**: The swarm server enters this state automatically after completing **BOOTING** or after finishing the **WEIGHT_SYNCING** state. This represents the sampling phase.
- **ROLLING_POST**: When the swarm server determines that the sample pool is sufficient for proceeding to the next policy gradient step, it automatically transitions to this state. While in this state, ongoing episodes can still complete normally, but no new episodes can begin.
- **WEIGHT_SYNCING**: After being in the **ROLLING_POST** state, once all computational resources and threads related to ongoing episodes are reclaimed and cleaned up, the swarm server transitions to this state. During this stage, VERL completes the current policy gradient strategy update and then returns to the **ROLLING** state, repeating the cycle.
### 2-2. Read your dataset and create training epoch loop
```python
LOCAL_DATASET_PATH = "/mnt/data_cpfs/dataset/openai/gsm8k/main"
dataset = RouterTaskReader(
reader_type = "huggingface_dat_repo",
reader_config = AjetTaskReader(
huggingface_dat_repo = HuggingfaceDatRepo(
dataset_path = LOCAL_DATASET_PATH
)
)
)
for epoch in range(LOCAL_NUM_EPOCH):
for _, task in enumerate(dataset.generate_training_tasks()):
for _ in range(LOCAL_GRPO_N):
print(task)
# executor.submit(rollout, task) # this is the place to begin a agent workflow / agent loop, we come back here later
```
You may ask: when does the policy gradient & llm weight update take place?
The answer is simple: **the swarm server takes care of everything related to training, while the swarm clients do not need to worry about this process at all**.
By default, when enough amount (>=batch size) of samples (with reward) reach the swarm server, that when a llm weight update step begins.
Please run `ajet-swarm overwatch` during training, this panel displays everything about the weight update timing, transparently.
When opening this panel, you can see 3 modes which you can select from: "rollout_until_finish_enough_episodes"(only count episodes), "rollout_until_finish_enough_tasks" (+consider task group), "rollout_until_finish_enough_non_dummy_tasks" (+consider group reward)
Another important thing to notice: each task must have a valid task_id (str), which is used to:
- Group up epsiodes that belong to same task inside swarm server (you do not have to worry about that).
- Used as a random seed if the task is a game requires random initialization. (e.g. werewolves game's player identity)
### 2-3. Intergrate with your agent loop.
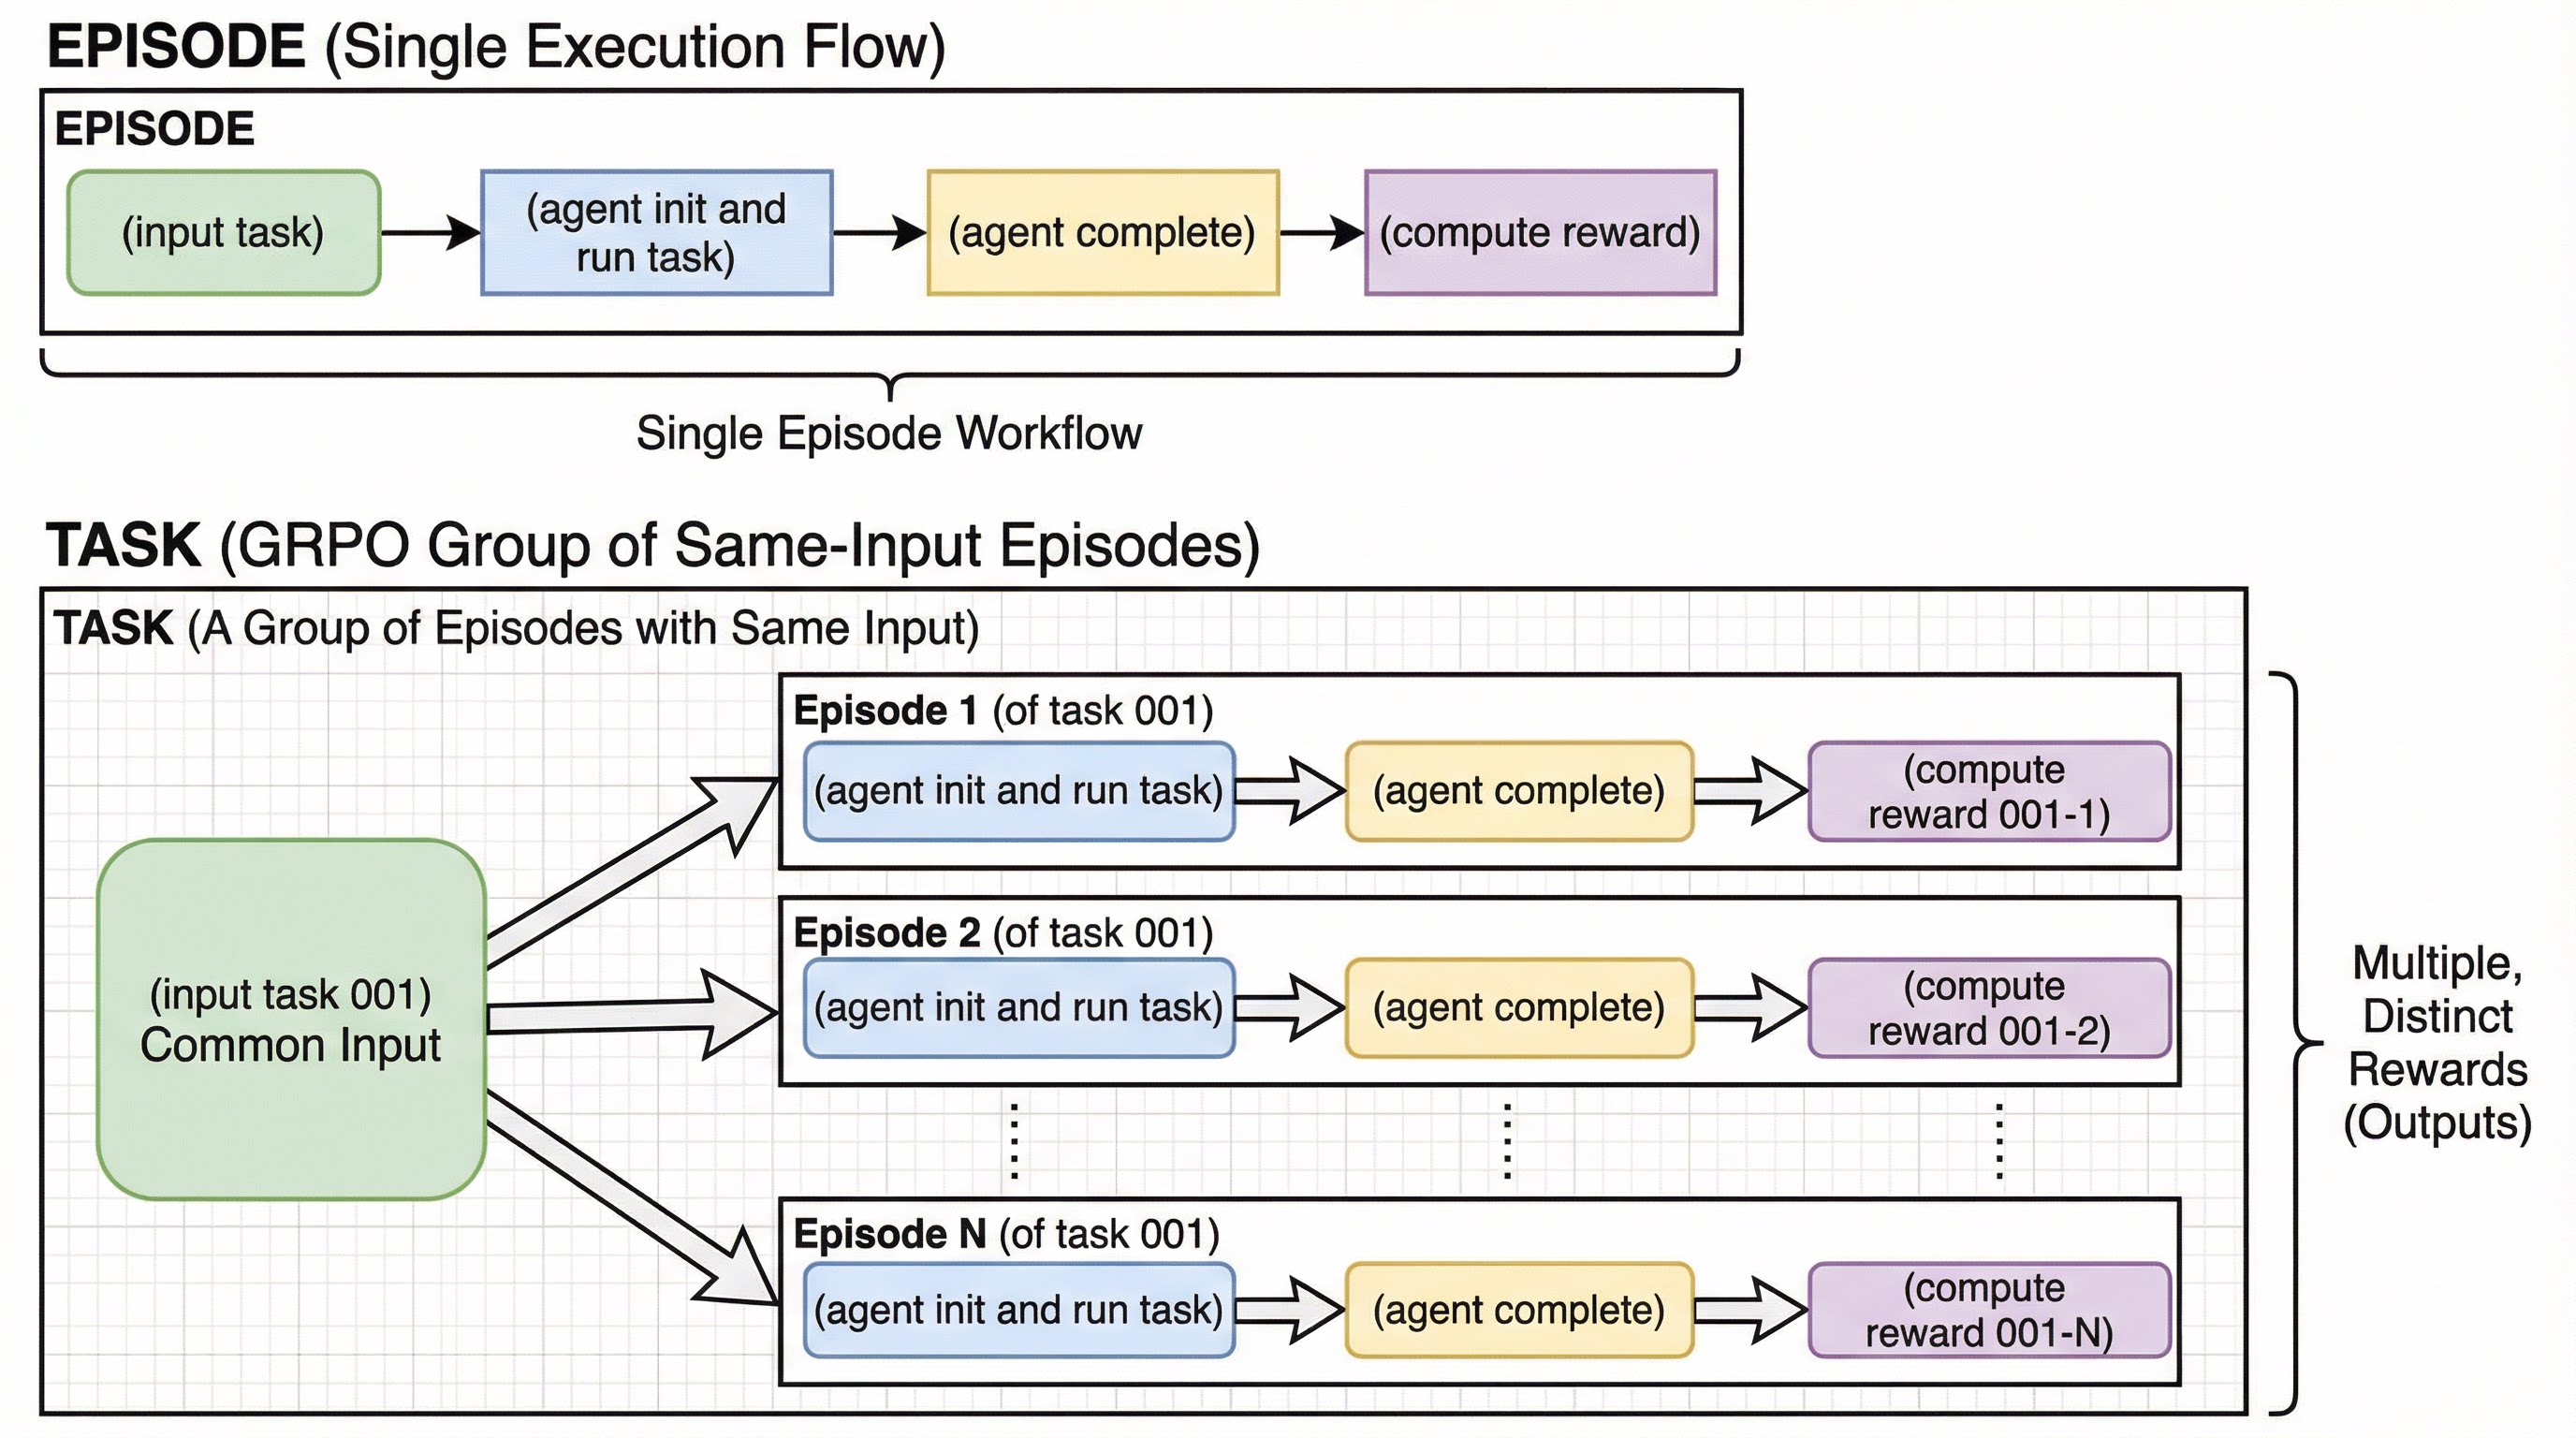
Before intergrating your agent loop, we need to explain two concepts: **Episode** and **Task Group**.
The following process is called an "**Episode**":
*<br/>
(input task) -> (agent init and run task) -> (agent complete) -> (compute reward)
<br/>*
And in comparison, we call a group of same-input episodes a **Task Group**:
*(input task 001) -> (agent init and run task) -> (agent complete) -> (compute reward 001-1)
<br/>
(input task 001) -> (agent init and run task) -> (agent complete) -> (compute reward 001-2)
<br/>
..............................
<br/>
(input task 001) -> (agent init and run task) -> (agent complete) -> (compute reward 001-N)*
With these two concepts in mind, we can write our training program (yes, this is training, NOT just inference):
```python
def rollout(task):
try:
# begin episode
episode_uuid, api_baseurl_key = swarm_worker.begin_episode()
# execute agent ( base_url = api_baseurl_key.base_url, api_key = api_baseurl_key.api_key )
workflow_output = execute_you_agent_here(task, api_baseurl_key) # reward is in `workflow_output`
# report output back to swarm remote
swarm_worker.end_episode(task, episode_uuid, workflow_output)
return
except:
pass
executor = BoundedThreadPoolExecutor(max_workers=LOCAL_MAX_PARALLEL)
for epoch in range(1024):
# loop dataset epoch
for _, task in enumerate(dataset.generate_training_tasks()):
# loop dataset tasks
for _ in range(LOCAL_GRPO_N):
# loop episode
executor.submit(rollout, task)
swarm_worker.stop_engine()
```
Explaination:
1. each agent workflow (each episode) must be started with `swarm_worker.begin_episode`,
which take vLLM/SGLang computational resource from swarm server, and returns `api_baseurl_key`.
2. take `base_url = api_baseurl_key.base_url` and `api_key = api_baseurl_key.api_key`, run your agent, compute reward, and return `workflow_output` to wrap the computed reward.
3. call `end_episode` to report reward to swarm server. (or alternatively call `abort_episode` to give up this episode, hoping to rollout something else in next try)
4. the whole `swarm_worker` thing is thread safe, go threading any way as you wish.
5. you can kill this script in the middle from the training, move it to another computer(s), and resume training without losing any progress.
6. you can **debug during training**, this is a crazy but very useful feature. Just change `end_episode` to `abort_episode` and remove `stop_engine`, and then you can copy the modified script to wherevery you want, and debug however you wish.
## [Demo 1]: Regular Agentic RL (1 server, 1 client)
In this demo, we choose a simple gsm8k RL task.
### (D1-1) Sync and Bring Swarm Server Online
- Tell swarm server which model you train, and what are your training hyper-parameters.
- Tell swarm server to bring itself online.
```python
swarm_worker = SwarmClient("http://localhost:10086")
yaml_job = AgentJetJob(
algorithm="grpo",
project_name="ajet-swarm",
experiment_name="test",
n_gpu=REMOTE_ALLOCATE_GPU_PER_NODE,
model=REMOTE_TRAIN_MODEL_01,
batch_size=REMOTE_BATCH_SIZE,
num_repeat=LOCAL_GRPO_N,
# LoRA (optional): lora_rank=8, lora_alpha=16, lora_target_modules="all-linear"
)
swarm_worker.sync_train_config(yaml_job)
swarm_worker.start_engine()
# or simply `swarm_worker.auto_sync_train_config_and_start_engine(yaml_job)` to do two thing in one shot.
```
Hints:
- You can `yaml_job.dump_job_as_yaml('./config.yaml')` to take a look at the full configuration.
Ver no GitHubEste SKILL.md e muito grande, entao o SkillsMP mostra aqui apenas a primeira secao. Ver no GitHub
